
How to Convert a Photo to a Laser Engraving Vector with VectorWitch
A step-by-step guide to getting clean, machine-ready SVG output for wood, metal, and laser cutting projects.
Converting a photo into a vector file sounds simple. Most tools can produce a result in seconds. But if you have ever tried to engrave that result on wood or metal, you already know the problem: the file looks fine on screen, and burns badly on the machine.
VectorWitch is built specifically to solve this. It is not a general-purpose converter. Every setting inside it is designed around what laser engravers and cutters actually need: clean paths, controlled contrast, and no grayscale.
This guide walks through the exact workflow to get a production-ready engraving vector from any photo.
Why Standard Converters Produce Bad Engraving Files
Before getting into the VectorWitch workflow, it helps to understand why other tools consistently fail for engraving work. The problems are always the same.
1. Too Much Black Causes Overburn
Most auto-tracers convert shadows into solid black fills. On screen, this looks like strong contrast. On a laser engraver, it causes overburn: the material scorches too deeply, fine detail collapses, and the result looks blotchy rather than sharp.
A proper engraving file represents shadows through line density, not solid shapes. The laser needs breathing room.
2. Noisy Paths Produce Rough Edges
Standard tracing algorithms generate thousands of unnecessary anchor points to approximate curves. The file looks acceptable at thumbnail size, but when the machine follows those paths at full scale, the edges come out jagged and inconsistent.
Engraving-grade vectors require smooth Bezier curves with minimal nodes. The line must feel intentional, not reconstructed.
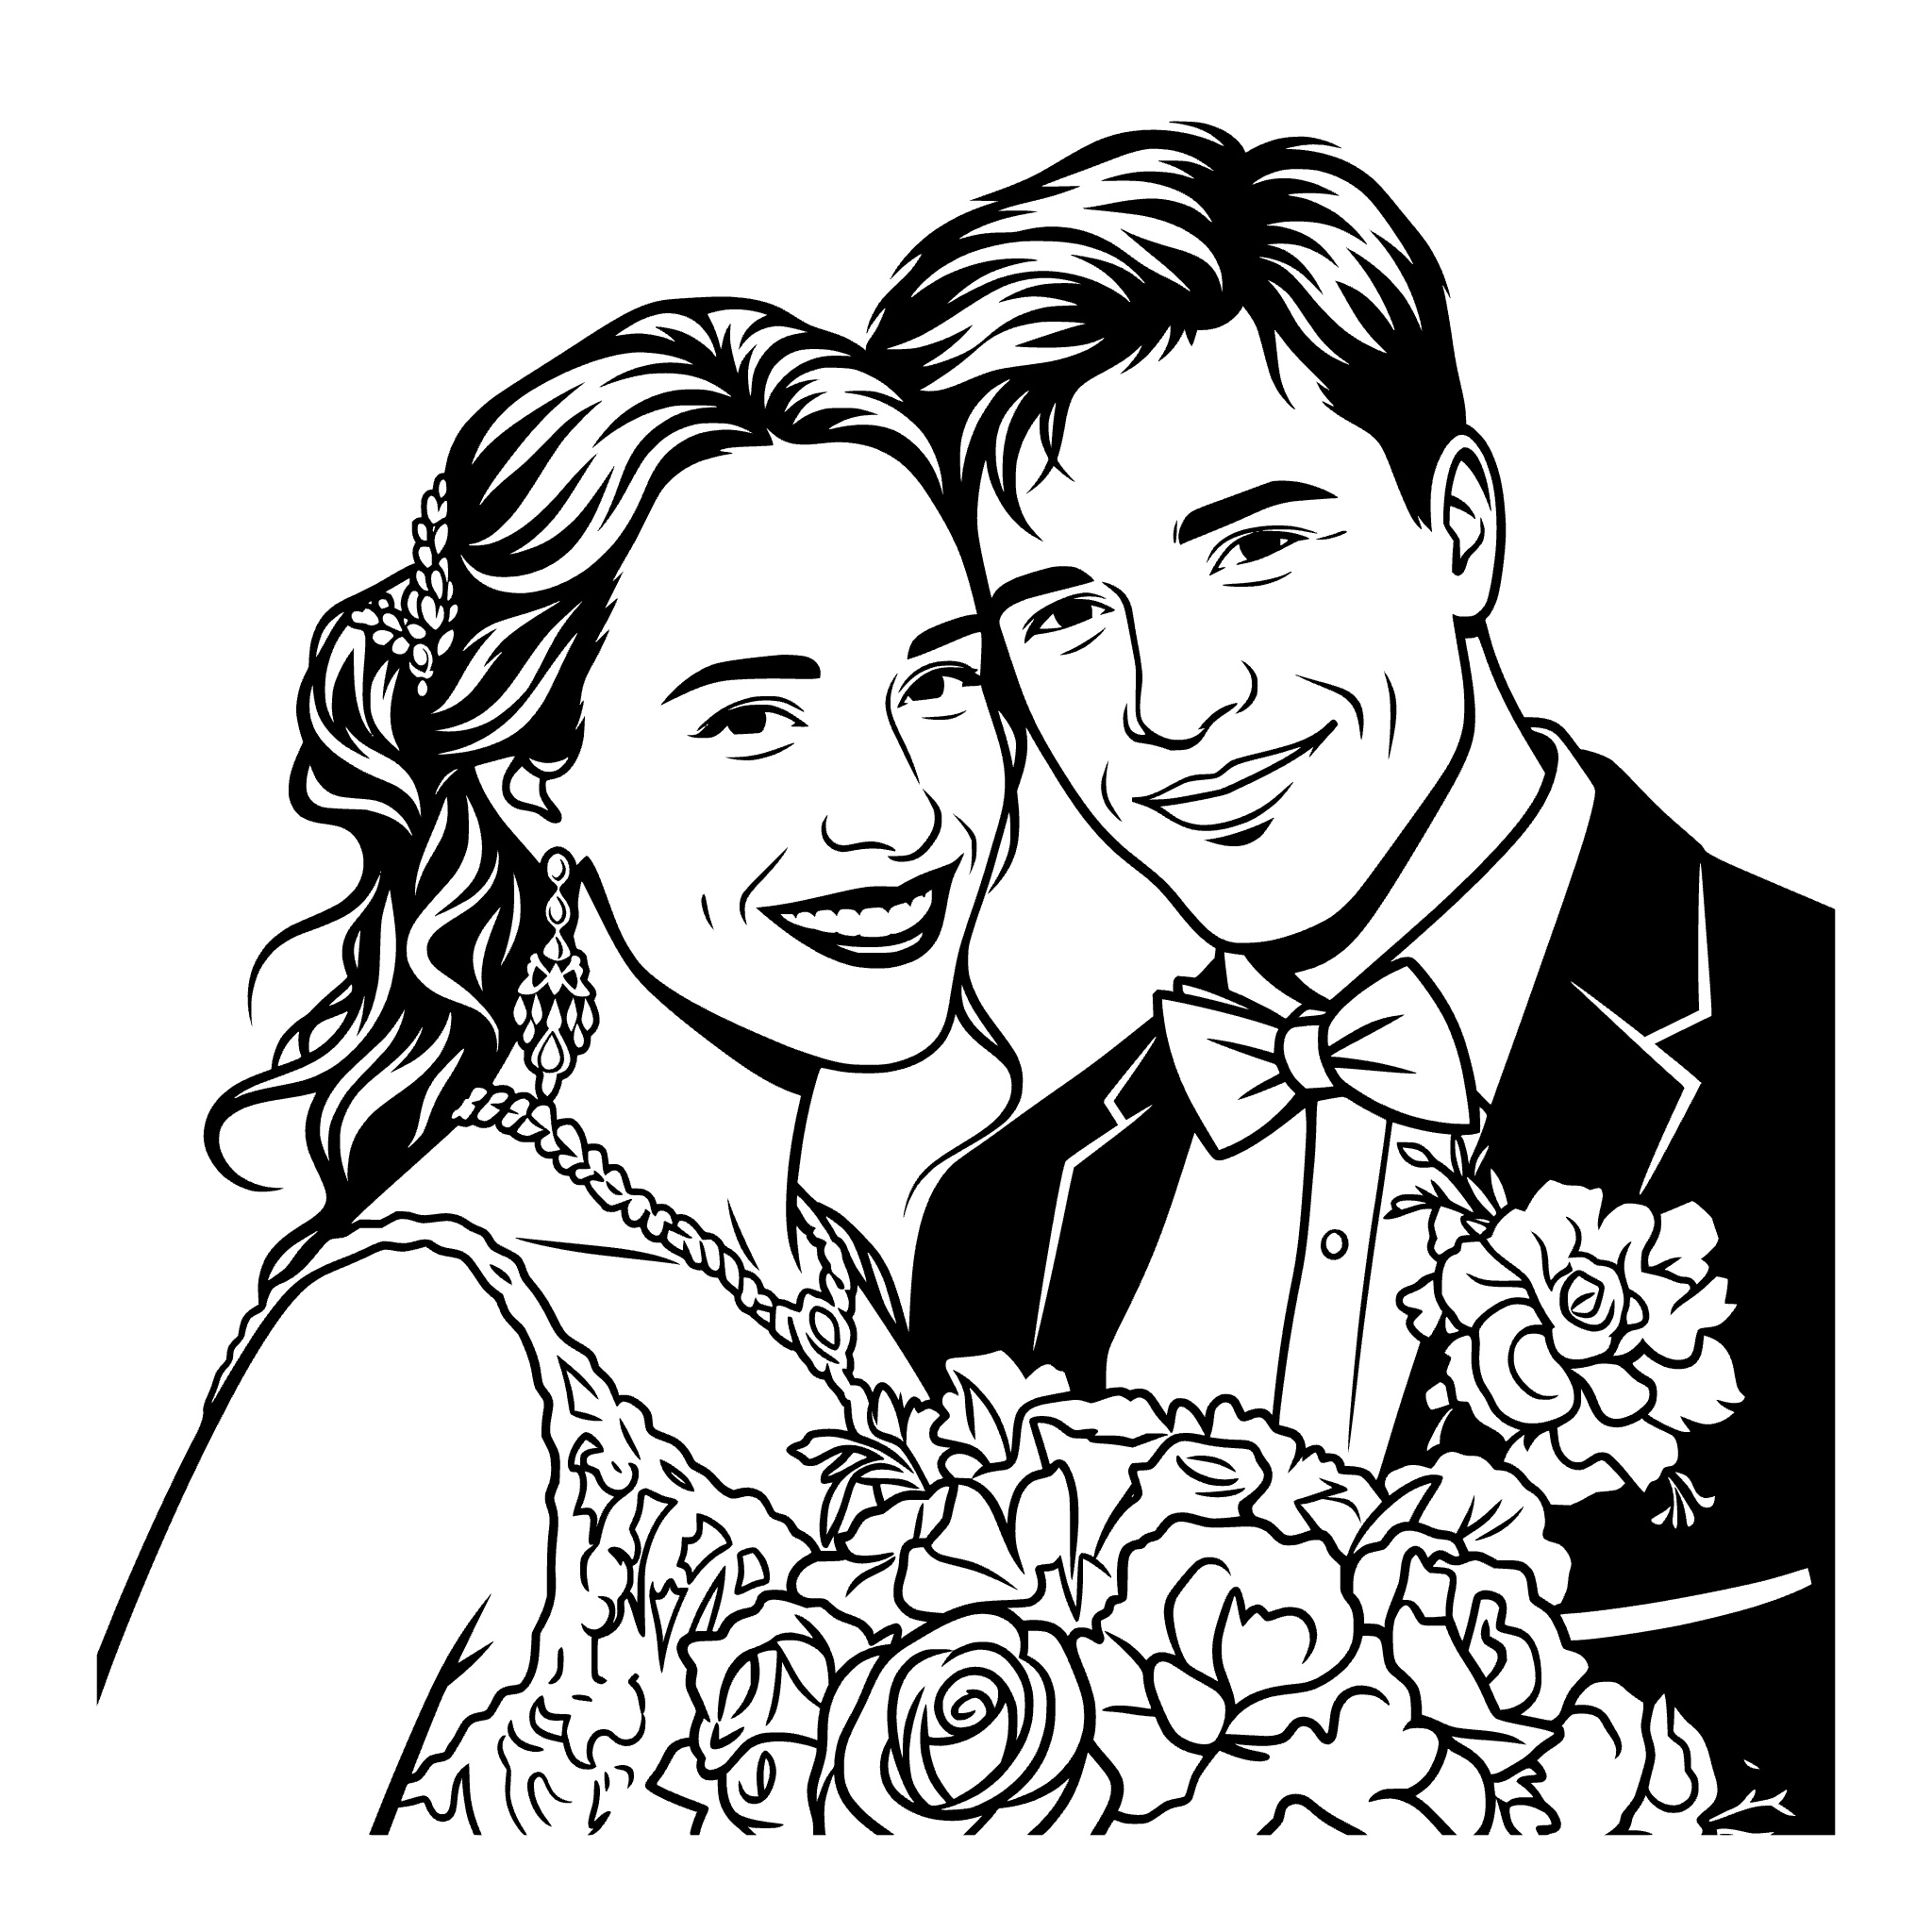
3. Portraits Lose the Person
Faces contain subtle gradients, fine structure around the eyes, and micro-contrast that distinguishes one person from another. Generic converters flatten all of this into simplified shapes. The expression disappears. The engraving looks like a silhouette.
Preserving facial identity requires linework that follows the actual structure of the face, not a threshold applied to the whole image.
4. Grayscale Cannot Be Engraved
Laser engravers operate in two states: on or off. A file with grayscale values or soft gradients will be processed unpredictably, or not at all. Every element in a usable engraving file must be fully black or fully white, with shading expressed through line spacing.
Standard Converters vs. VectorWitch
The table below shows the key differences between generic auto-tracing tools and what VectorWitch produces:
Feature | Standard Converters | VectorWitch |
Output type | Visual / print-focused | Machine-ready vector |
Facial detail | Flattened or lost | Preserved with linework |
Path quality | Thousands of noisy nodes | Smooth, minimal nodes |
Grayscale handling | Converted to solid fills | Replaced with line density |
Engraving performance | Poor, causes overburn | High, clean output |
Export formats | PNG / JPG only | SVG, PDF, PNG, JPG |
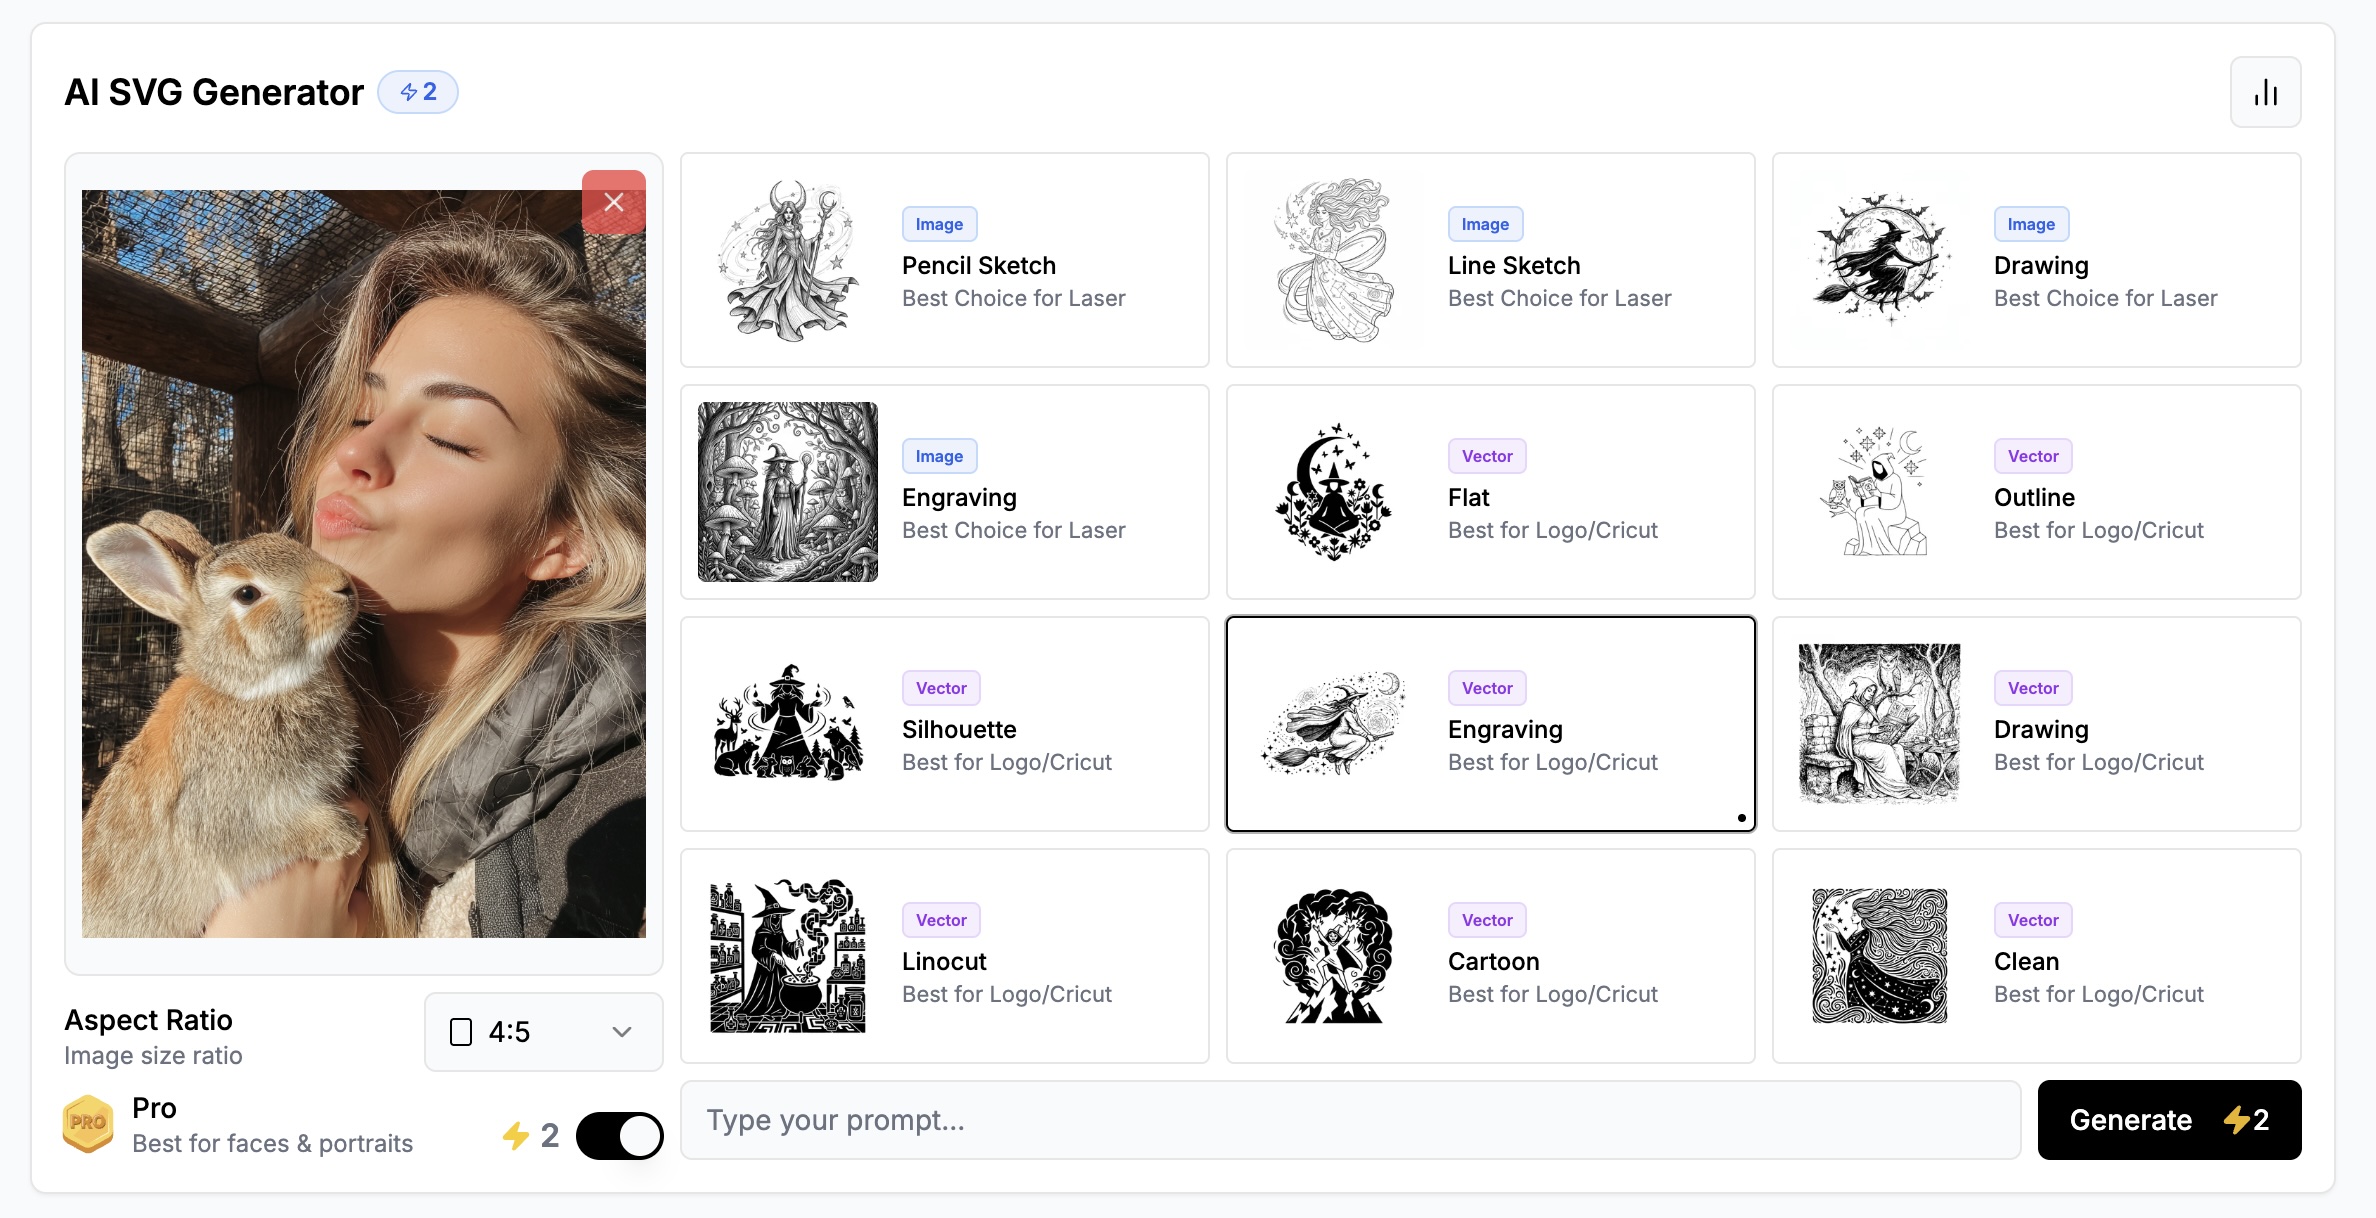
How to Use VectorWitch: The Full Workflow
The complete process takes three steps. Each one matters, and skipping any of them will affect the quality of the output.
Step 1: Upload Your Photo
Start by uploading the photo you want to convert. VectorWitch accepts standard image formats including JPG and PNG.
For the best results, use a source image with:
Even, diffused lighting, since harsh shadows are difficult to convert cleanly into linework
A clear subject with visible separation from the background
Sufficient resolution, at minimum 1000px on the short edge
Sharp focus, especially around the face if it is a portrait
Very dark, heavily compressed, or blurry images can be converted, but the output will reflect the limitations of the source. A clean input produces a clean output.
Step 2: Enable Pro Mode
Once your image is uploaded, turn on Pro Mode before doing anything else.
This is the most important setting in VectorWitch. Without it, the system uses a simplified processing path that reduces detail to produce faster results. Pro Mode activates the full conversion engine, which preserves fine structure, maintains edge quality, and handles facial detail correctly.
For portrait photos, pet images, and anything with complex texture or fine linework, Pro Mode is not optional. The difference in output quality is significant.
Step 3: Select a Vector Style Tagged as Engraving
VectorWitch offers multiple vector styles. For laser engraving and cutting, you need to select a style that carries the Engraving tag.
These styles are specifically designed for machine use. They produce output where:
Shading is built from line density rather than filled shapes
Contrast is controlled to prevent overburn on the material
Paths are smooth and minimal, following the subject rather than approximating pixels
The entire file is black and white with no grayscale values
Avoid styles without the Engraving tag for this type of work. Decorative or print-focused styles produce visually interesting output, but it will not perform correctly on a laser.
Quick check before downloading: Zoom in to 400% in the preview. If edges look rough at that scale, they will look rough on the material. Smooth curves at high zoom mean the file is ready to engrave. |
What You Get: SVG, PNG, and JPG Output
After generating with an Engraving style, VectorWitch provides the result in three formats.
SVG
This is the primary format for laser engraving and cutting. SVG files are vector-based, meaning they can be scaled to any size without losing quality. Most laser software reads SVG natively, including LightBurn, RDWorks, Inkscape, and LaserGRBL. Use the SVG when sending the job to your machine.
PNG
The PNG output is a high-resolution raster version of the same design. It is useful for previewing the result, sharing with a client for approval, or using in design mockups before production. Do not send a PNG to a laser machine in place of the SVG.
JPG
The JPG output serves the same preview and sharing purposes as the PNG. It is a compressed format, so it is smaller in file size but not suitable for production use. Use it for thumbnails, social media, or quick reference.
For production: Always use the SVG file when working with a laser engraver or cutter. The PNG and JPG outputs are for preview and communication only. |

Where This Workflow Works Best
The VectorWitch engraving workflow is suited to any project where vector quality directly affects the physical result. The most common use cases are:
Portrait engraving on wood or metal, where facial identity must survive the conversion
Pet portraits, where fine fur texture requires controlled line density rather than filled shapes
Personalized keepsakes such as bookmarks, ornaments, and cutting boards
Metal card and badge engraving, where smooth paths are required for consistent machine tracking
Cricut and laser cut files, where clean paths prevent material tearing and produce sharp edges
Summary
Getting a usable engraving vector from a photo is not about finding the fastest converter. It is about using a tool that understands what the machine needs.
The VectorWitch workflow is three steps: upload a clean photo, enable Pro Mode, and select a style with the Engraving tag. The output comes as SVG for production use, with PNG and JPG included for preview and sharing.
When the file is correct, the engraving is straightforward. The quality of the vector determines the quality of the result.